Sunday, December 30, 2012

Blackberry Monkey Bread with Vanilla Sauce


Whenever my sister comes to town, I make Monkey Bread. She's the one who turned me onto Smitten's version and it's been nothing a sensation since. It's small rounds of dough, dipped in butter, rolled in cinnamon/sugar, stacked together, and baked to perfection. This idea is similar to Portuguese desserts like rebanadas and filhoses. They key difference is Monkey Bread is not fried. 
This winter, I stumbled upon a new version of the classic by Kinfolk: monkey bread stuffed with blackberries. My brother's favorite fruit is blackberries and the rest of the family enjoys them as well. Christmas was the perfect opportunity to try it out!


The concept of this recipe is amazing. The execution... had me a little frustrated. The Kinfolk recipe does not provide the most detailed directions.

1irst, it says that you need "300 blackberries or 10 cups." That's a LOT of blackberries. All you need is 4-5 blackberries per round. So that's  20 rounds of dough X 5 blackberries = 120 blackberries max. I'm seeing a slight discrepancy... and a lot of leftover blackberries.


2econd, it doesn't tell you what size dish to use for baking. I looked at the picture and couldn't accurately gauge the size. So I went with a standard 9-inch round tart dish and lo... things were barely fitting. The result was a muffin top look, with bread literally spilling over the edges and the center not cooked all the way through.

Use a 10-inch round pan and if you're worried about burning the top, place aluminum foil on top  when it starts to brown (around 20 minutes).  I think smaller rounds would be great to incorporate more blackberries in the dough... an experiment for another day!
3hird, and final concern is the amount of yeast.... a whooping 3 tablespoons. What in the world? For a single layer of rounds? Regular monkey bread has 2 1/4 teaspoons and almost the same amount of flour. Could someone please explain the need for THIS much yeast? Does it expedite the rising? Just sniffing the final product, my "2nd mom" (a pro in the kitchen) said, "smells yeasty." 


All that aside... yes. It is a lovely thought and I am very excited to try it again with the usual dough recipe.   Everyone enjoyed the outer ring of well cooked yumminess. The powdered sugar on top was a beautiful touch and really made this feel like the holidays.  It's like a dusting of sweet snow!


The other awesome add-on to this bread is a warm vanilla bean dipping sauce. It's a rich concoction of egg yolks, a whole vanilla bean, and dairy. It's very mild in flavor and is the perfect accent to the tartness of the blackberries.


I mean seriously... check out Susana licking the plate clean... yah bet you didn't think I could snap a picture that quick huh lady? Got that ninja status! Beijus!


Note: if you're using fresh blackberries, it is best to buy them the day of because they tend to go bad very easily. If you need to buy some time, wash them in a 3 to 1 ratio of water and white vinegar (i.e. 3 cups water plus 1 cup white vinegar).

Give it a shot and let me know your results! All insights and input are welcome. For the full recipe, check out Kinfolk!

Thursday, December 27, 2012

3 in 1 Holiday Cupcakes

Okay. I'm seriously late to the party with these cupcakes but that's a given with the holiday season. I was planning on posting before Christmas but the perfectionist in me demanded white chocolate decorations on the frosting. After 3 failed attempts to melt white chocolate, I gave up (oh lookee there... the chocolate expired last year...slick) and went to bed. They were given out to office but I held onto these guys for posterity. 

The magic of these cupcakes are their versatility. 12 cupcakes split into 4 peppermint trees, 4 snowflakes, and 4 cranberry cinnamon! The base is a perfect vegan chocolate cupcake. I've made it before and really loved the flavor! Make sure to use good quality chocolate, especially with vegan and gluten-free cakes because there are no other rich ingredients to distract the taste buds.

Now the frosting is one recipe split into 3. It's a very basic vanilla butter cream- straight sugar and unsalted butter. With a dash of food coloring, spices, and extracts, you can create as many variations as the imagination can hold. Split into three bowls and get creative!


For the little green tree, I added a DROP of peppermint extract. Now careful with that peppermint- it's some potent stuff so literally use a drop at a time. I used the green food coloring on hand but honestly, I would like something a little more earthy like Cupcakeando's Italian Meringue version. Again, go a drop at a time since it's not a lot of frosting in the bowl. The tree-spiral is from a 1M tip (wilton) with little sugar pearls as decorations.  The star is white chocolate. Who knows, maybe next year there will be a little bit of ganache under the tree!


The snowflake is now stranger to this blog; it's one of the first cupcakes I posted! It's simply the buttercream with a drop of blue food coloring. I was thinking about keeping it natural with blueberries but they tend to be more purple. I tested blackberry jam mixed with the buttercream and that too was (delicious) purple. The snowflake is white chocolate melted and piped onto a snowflake pattern drawn on parchment paper. If you want your white chocolate to stay strong, you can dip the snowflakes in ice water (which makes me nervous because they're fragile) or use white melting chocolate.


Then my favorite... the cinnamon cranberry. Candied cranberries are beautiful but must be planned in advance. They sit in simple syrup overnight, rolled in sugar, and then must dry for a couple of hours. The result is a lovely cake topping! For this frosting, I simply added cinnamon. Feel free to sneak in a drop of almond extract?

I apologize again for the tardy post! Save it on your pinterest for next year! Happy Holidays!

What You Need:

1M Wilton Tip
Your favorite chocolate cupcakes, might I suggest: Chocolate Vegan Cupcakes
101 Cookbooks: Sparkling Cranberries
Vanilla frosting, this one works well: Basic Vanilla Buttercream

Friday, December 21, 2012

Malt Cake Madness


There's something magical about celebration cake. I can't put my finger on it. Yah it's cake. But it's celebration cake. One of the key ingredients (and don't roll your eyes) is good intentions. You're baking to express a sentiment... not solely for a sugar buzz. This cake was made for a very dear and near friend. I don't want to put his business out there so we shall call him... Cash Money. 


Recently, Cash Money was promoted from a part-time intern to a full-time employee.  This isn't one of those scenarios where an opening appeared out of the blue or it was a hand out from a family friend. Cash Money earned this promotion. He put in the hours and weekends like any hard worker.
 

The catch is, Cash Money has a small anxiety thing. I'm not going to call it an "issue" or "disorder" because that would imply something is wrong. There's nothing wrong with him; he's a strapping young man with a great sense of humor and kind heart. It has, however, presented Cash Money with obstacles that few could ever handle with such determination and courage. I've watched him endure the waves of whatever is going on inside and have tried to hug the shakes away. He pushes through every time. Honestly, I don't know how he does it and balances going to school. That's right... he's working hard on that bachelors too. Monster!


Cash Money, I am proud of you and honored to be one of your homies in arms! You're a living legend. Whatever choices you make, know that we support and love you. Go at your own pace. RFMH.DFMH.KFMH! All that being said, onto the celebration cake.

This cake came out of thin air. I was stumped as to what to make since Cash Money isn't a picky eater. My eyes landed on some Class Malt dry mix in the cabinet. That tiny hamster in my brain woke up, lazily took one step forward on its wheel, and went back to bed- enough motion to catch my attention. The result is this Malt Madness Cake.


I used my go-to White Cake recipe (thank you America's Test Kitchen) paired with malt frosting. White Cake is a tabula rassa, it can go with any frosting because of its innocent, clean flavor. It's soft, moist, and generous. And remember, the key to white cake is eggs at room temperature! If you want more of a "whopper" candy flavor, I would go with a German chocolate or any other subtle chocolate cake.  


The frosting is where things got fun. I treated it like any old buttercream but it did not yield the soft frosting I was hoping for. It was yummy, but too thin. I didn't want to add anymore sugar because it would be overpoweringly sweet. I am not a fan of buttery buttercream (irony?) so more butter was out of the question. Heavy whipping cream came to the rescue! It gives volume and a silky texture that cannot be beat. Overall, its a very classy cake. My brother actually asked if it was amaretto frosting! I loooove the color of this frosting! Who knew Malt could be so polished?


Malt Cake Madness

White Cake from America's Test Kitchen

Michele's Malt Frosting

3/4 stick unsalted butter, softened
1/2 teaspoon salt
1 1/4 cup powdered sugar, sifted
1/4 cup all-purpose flour
1 teaspoon pure vanilla extract
1/4 cup heavy cream, plus another 1/2 cup
2 tablespoons-1/3 cup Malt powder (I used Classic Malt by Ovaltine)
In a small pot, bring about 2 inches of water to a slight boil.
A few whoppers, crumbled to garnish (optional)

In a heat-proof bowl, cream together butter and salt. Butter mixture will be thick. Turn off the mixer, scrape down the sides of the bowl and add powdered sugar. Turn mixer on low and mix in powdered sugar. Add vanilla extract. As the sugar incorporates, raise the speed of the mixer to beat the frosting. Beat until relatively smooth. 

Place (in the heat proof bowl), over the small pot of slightly boiling water  (double boiler style). Add the flour. Whisk until it becomes silky. Set aside to cool.

In a 1-cup measuring glass, stir together heavy cream and 2 tablespoons of Malt. Turn mixer speed to medium and pour cream mixture into frosting in a slow, steady stream. Taste test. Is there enough malt flavor? If you're not satisfied, keep adding, one tablespoon full at a time. Is it too sweet? Add more flour. You don't want it to be over powering, just subtle! Place in fridge to rest.

While the frosting rests, pour remaining 1/2 cup of heavy cream in bowl. Starting a low speed and working your way up, whisk cream until it's thick and billowy. Add half to the butter-malt mixture and fold until smooth. Keep adding until it's right amount of fluff you so desire!

Garnish with crumbled Whoppers!

Monday, December 17, 2012

Engagement Shoot Highlights


July marked the most magical day of my existence: the man of my dreams proposed. He caught my attention the moment I heard his laugh because it was so genuine. That was back in what, 2007? As cheesy as this sounds, we met through dancing. We both break dance. He was the sole respondent to a post I had placed on a local forum for practice spots. It was just practice after all.

Little did either of us realize that this casual exchange would define what was to be.


The photo shoot was done by a family friend and his cousin. They're both growing photographers and were thrilled to have some guinea pigs. As you can see- they did an amazing job.

I must admit, I was not initially excited to have the pictures taken on the dock. It was chilly and windy out so all that hair straightening was literally blown away. It was totally worth it though. I love fall colors and these pictures really captured that VA landscape. Browns, reds, and yellows! Beautiful!


We laughed the entire time. Rick's wife carried the light reflector like a turtle shell; our mother's conspired all cozy with a blanket on a nearby bench; and Daniel snapped goofy candid shots as we struggled modeling.

My advise is if you need fancy pictures, have them done by somebody you're comfortable with. My co-worker, whose also engaged, and I compared notes from our separate experiences. They had a difficult time with their shoot because the photographer wanted them to strike artificial poses and act super cutesy. It's all about being natural. 


And what's more natural than the median in which we met. If a man could fall in love with me based on what I wear to practice, he really ain't superficial! Nothing spells romance like sweat and sneakers. We kept this segment short and sweet with my trademark hat and his love for fresh Stussy.

This man is the best thing that could have happened to my world and I cannot wait to officially be the wifey. Never settle- be with someone who will take care of your soul.  DMD, all day every day. Ride for mah homies!

Thanks for peeping!

Wednesday, December 12, 2012

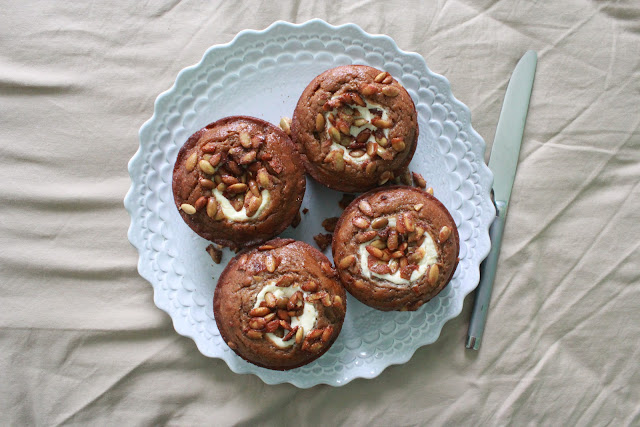
Teenie Cake's Pumpkin Cream Cheese Muffins with Pepita Crunch


You win yet again, Starbucks. In terms of coffee, the only drink that keeps you in my good graces is a long standing love for bitter iced lattes. There's nothing quite like angry espresso paired with a sweet treat. The bakery department is where you've caught my eye.  


First it was the lemon bars... creamy and tart with a crumbly crust. We're talking full bars, not the minis they serve now to be health conscious. The bars vanished only to be substituted with black bottom cupcakes. These cupcakes were my study companions throughout college. For every chapter of Health Psychology outlined- I allowed myself a single bite as a reward. To my sorrow, they too vanished from the menu.


There are two pastries left that make me wide eyed with joy, and they're both seasonal. For the winter, it's all about the cranberry bliss bar. In the fall, pumpkin rules and the king is the Pumpkin Cream Cheese Muffins! I set out searching the internets for a copy-cat recipe.


This search brought me to Teenie Cake's cooking blog! She created her own version based off of the Starbucks muffin. Glee! You can see that I commented on this recipe all the way back in 2010. It never left the radar and this fall, I found the perfect time to make them: our engagement pictures.


I brought them along for the shoot, which was done by Rick (a Sullivan family friend and growing professional photographer) and his cousin. I offered them as a small token of appreciation to the awesome camera crew who in turn snuck in a few snapshots. 


Don't mind the awkward picture, we were too busy stuffing our faces to care about the camera at this point. Everybody loved them! Even my mom said, "you made these?" They are triple threat with muffin, filling, and topping. There's a whole cup of pumpkin filling in the batter and the usual spice suspects (cinnamon, nutmeg, ginger, and cloves). Note, the recommended pumpkin is the filling version- not the straight canned pumpkin. Pumpkin pie filling already has the spices mixed into it which only helps deepen the flavor. The texture is moist and soft with a nice density. There's no granulated sugar-  it's straight brown sugar which gives that rich color. 


The filling is a combination of cream cheese, cottage cheese, and a touch of sour cream. The lemon zest is a crucial element to this filling. It's not overly sweet and is fun to eat around. I used the ENTIRE mix because I didn't want anything to go to waste. I also baked them in these jumbo cupcake tins. As you can see... this made for some mega muffins. Ohhhh darnnnn....

And finally, my favorite element: the pepita crunch. Pepita is a fancy word for pumpkins seeds. Simply toss them in some egg white and sugar! A few minutes in the oven and you have a delectable touch to an already yummy muffin. Mike's not too keen on pumpkin seeds and even he kept them on top. Heck, I saved some on the side as a snack.

If you feel so inclined, a little simple syrup helps seal in the moisture. Boil 1/2 cup water with 1/2 cup granulated sugar. Stir until dissolved completely. Allow it to cool and then brush on top of muffins. Hooray for home-made baking adventures!

For the full recipe, check out Teenie Cake's blog! Thanks again Teenie for another great culinary treat!

Sunday, December 9, 2012

Sweet Potato Pie for Mr. Worthington


Years back, I was a camp counselor for a summer program called Rec-Pac. If you're a Fairfax County, Virginia kid, you're probably familiar with this program. It gave kids a structured summer and parent's an all-day babysitter. I did it for several summers during college. It was an interesting job filled with stress, laughter, and drama. I found that it was possible to overcome any obstacle, so long as the staff worked together. Sound cheesy? You try getting a gymnasium full of screaming 3rd graders to sit down and shuddap solo.


Supporting the counselors were counselors in training (CIT). They were basically Rec-Pac's version of unpaid interns! Most were high schoolers looking for a way to build their resume or whose parent's didn't want them playing video games all summer. Due to the age difference, CIT's and counselors didn't really interact like that.


And then there was Brandon, the CIT that managed to wiggle his way into my heart. In this blog, I typically reference him as "Kuya" which means brother in Tagalog (neither of us are Filipino).

The day before the kids arrived, the staff set up their assigned school. There was the usual awkwardness as a bunch of strangers were brought together. I was in the art room when Brandon showed up. He was very quiet but had all the markings of a break dancer. The shoes. A hat. The arm band. I was wearing Adidas shell toes, a popular dance shoe back in the day. We both kept giving each other the up and down. Does he break? Does she break? Then I caught him doodling someone break dancing and the ice was broken. 


From that moment on, Brandon found his new punching bag. He hit me with dodge balls, chased me with food carts, and tripped me using cheesy kung-fu movie moves (leaf whirl wind kick). At the same time, he was one of the sweetest, most level-headed people I'd ever met- regardless of our age difference. To be this awesome, his parents must have been doing something right.


And no joke, his parents were strict. They were just as bad as my mother. I remember walking over to the van to ask his dad if Brandon could go to a break dance competition one weekend. Mr. Worthington was just like his son: sweet, polite, and level headed (and the answer was "no"). The entire family makes you feel welcome and loved. You can't walk in the door without a happy greeting and a hug. Who would have thought 7 years later, I'd be making birthday pie for his pops? Madness.


This is a basic sweet potato pie. Honestly, I didn't see much variation from one version to the next online. The key difference seems be the use of evaporated milk vs. whole milk and the presence of brown sugar. The crust I used is buttery and flaky (thanks again Smitten!) while the filling is smooth and spiced.I tried to create a pie merging the best traits of all versions. Hope you enjoy!


Sweet Potato Pie
adapted from allrecipes.com

1 unbaked chilled pie crust- store bought or my favorite my Smitten!
1 lb sweet potato
1/2 cup unsalted butter, softened
3/4 cup granulated sugar
1/4 cup brown sugar
1/2 cup whole milk
2 eggs
1/2 teaspoon nutmeg
1 teaspoon cinnamon
1 teaspoon coriander
1 teaspoon vanilla extract
2 tablespoons of brown sugar on the side


Make sure your pie crust is ready to go and in a 9-inch round pan. Set in the fridge to chill. If you're making it from scratch, I always recommend making it the night before to save time.

Preheat oven to 375. Bake sweet potatoes  wrapped in aluminum foil with skin for 60-90 minutes, or until tender. Let cool and then peel off skin.

Break apart sweet potato in a mixing bowl. Add butter, and mix well thoroughly. Stir in sugar, milk, eggs, nutmeg, cinnamon and vanilla. Beat on medium speed until mixture is smooth. Set in fridge.

Preheat oven 350 degrees F (175 degrees C). Once it's hot, take out the chilled pie crust and sprinkle the 2 tablespoons of brown sugar on top. Pour the pie crust on top. Bake for 55 to 60 minutes, or until knife inserted in center comes out clean. Pie will puff up like a souffle, and then will sink down as it cools.

Monday, December 3, 2012

Chocolate Fudge Cake from What Katie Ate


"The year of the Rat," according to that one Chinese restaurant place mat: "You are ambitious, yet honest. Prone to spend freely. Seldom making lasting friendships." I remember reading this as a kid at Bamboo Buffet during one of our crowded family dinners with the Duartes. Even at that age, I saw a universal truth to this place mat.

It is hard to make lasting friendships. Like... really hard.


Time passes. People grow. Space distances. Schedules interfere. Some friendships require work; others remain comfortable no matter how long you haven't seen one another. It's natural. When you do find those friendships that stand the test of life, you know you've got something special

We had a post-Thanksgiving "Friendsgiving" potluck this past weekend and it was scrumptious! It's a pretty international group so every dish had it's own identity. Allen brought Chinese scallion pancakes; Sulava repped the vegetarians with eggplant and tofu; Joey picked up Peruvian chicken; Melissa made Italian meatballs; Mike cooked Unami Turkey burgers; and Aziz blew everybody out of the water with his amazing Somali Chicken and Biriyani. Post on Biriyani to come!


That left me with the sweet tooth. I went with a recipe I've been wanting to try for quite awhile from What Katie Ate. It's a monstrous Chocolate Fudge cake.  Chocolate is in the name- so don't wuss out on the quality. Give this cake love because you're making it for people you love. 


This cake is no joke. It's very easy to make, basic ingredients, and all you need is a single 9 inch round pan. The part where I struggled was halving the single layer of 9 inch round cake. My cake leveler.... umm.. well... it sucks. Terribly. I've been aware of it's wobbly blade for awhile. This past Saturday, there was no denying its evil. 


At this point, there was only two options: keep it as a single layered cake or make a second layer. You can already guess who won. Katie's directions state that if you want a 3 layer cake, you double the recipe and split evenly amongst 3 cake pans. I doubled the recipe and divided it between 2 pans. Yup. That's a LOT of cake.


I was very excited that the batter contained a generous tablespoon of blackberry jam! No one could detect the subtle difference other than my brother. It's not fruity but it does bite make some of the sweetness.

The cake's texture is soft and yet heavy. This is why you should halve a single layer of 9 inch cake. By itself, it just a bit too much for a chocolate light weight.


Plus, with two thin layers of cake, the fudge-like aspect of the cake really gets to shine. This can be accredited to the frosting! It is elegant and silky which provides a fantastic balance to the entire production. It's a fun butter cream to decorate! You could do the traditional, smooth look... or let it go wild. I literally smacked the cake with the flat of a dull knife to make crazy uneven peeks everywhere.

If you're looking for a rich, decadent chocolate cake with a slight twist, this is your fellow! The next time I make this, I may add something with a lil crunch in between the layers to interrupt the texture. 

For the full recipe, check out my favorite Aussie foodie, What Katie Ate.