Thursday, February 25, 2010

Cinnamon Toast Crunch Cinnabuns : Part I

The worst/best idea is to go to the grocery store when you're hungry. Suddenly, everything looks glorious and you need to take it all home that instant. Yes, I can eat an entire frozen pizza and box of cookies, don't question my judgement right now!

Well, I was in that place a few weeks ago after a late night break dance practice. Strolling through the cereal aisle, I was nearly crushed with the weight of judgement. Golden Grahams? Special K? Lucky Charms? Cinnamon Toast Crunch? You can already guess who came home with me.
By chance, I stumbled upon this recipe from Sugar Plum Sweets. The stars aligned and I had to try it out. These are standard issue cinnamon buns. The only difference is the addition of the cereal crushed in the center to add a little crunch.

Cinnybun:

1 tablespoon active dry yeast
2 tablespoons granulated sugar
1/2 cup warm milk (not hot)
1 large egg, lightly beaten
1/2 teaspoon vanilla extract
1/4 teaspoon salt
4 tablespoons unsalted butter, softened, divided use
1 2/3 cups bread flour
1/4 cup packed brown sugar
1 teaspoon ground cinnamon
1/2 cup crushed Cinnamon Toast Crunch cereal

Frosting:

5 tablespoons confectioners' sugar
2 teaspoons milk

In the bowl, whisk together yeast, granulated sugar and 1/2 cup warm milk until well combined; allow to sit 5 minutes. Lesson learned, I used organic yeast for the first time and I have to say, I was not impressed. Though the rolls came out fine, I felt they were more doughey than usual. Sticking to my standard yeast next time.

Add egg, vanilla, salt and 2 tablespoons butter, and mix using a dough hook, until well combined. If you don't have the hook, you will survive with a regular attachment. I got lucky and found ours in the drawer!
Add flour and mix on medium speed for 5 minutes. Remove dough onto a lightly floured surface, and knead for an additional 5 minutes. Shape dough into a ball, place in a greased bowl, lightly cover, and allow to rise in a warm area for 1 1/2 hours. I was told the higher the location you let the bread sit, the better because heat rises.

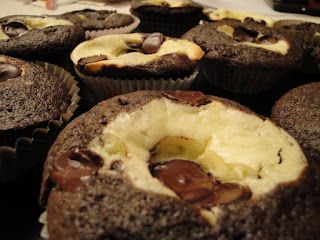
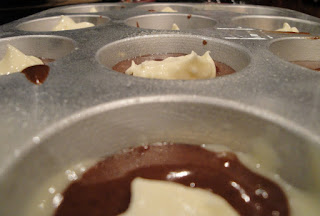
Roll dough out using a rolling pin, into a 13x9-inch rectangle. Spread remaining 2 tablespoons butter over dough. Sprinkle brown sugar, cinnamon, and cereal over dough. Roll up, jellyroll style (like a burrito!), and slice very ends off. Slice log into 6 equal pieces, and place in a greased and floured 9-inch cake pan. Lightly cover and allow to rise in a warm area for 45 minutes.

Preheat oven to 350 degrees. Brush a little extra melted butter over rolls, if desired. Warning: make sure you flour the bottom of the pan and easy on the butter. A few of mine were slightly caramelized on the bottom because the butter dripping to the bottom of the pan and not being absorbed enough by the flour. Bake 20-25 minutes or until golden brown. Remove from oven and cool on a wire rack for 15 minutes.

For the frosting, stir together confectioners' sugar and additional 2 teaspoons milk until combined; drizzle over cinnamon rolls, and serve.
These came out pretty good; I still like the Pumpkin ones better but that's because I simply love pumpkin and it really did switch it up on a classic. If you're looking for a solid cinnamon bun with a lil crunch, these are a win! Even though Bruce made his impatience for cuddle time clear as he watched....

Wednesday, February 24, 2010

Black Bottom Cupcakes

Also known as the cupcake Starbucks should not have discontinued. During college when some serious reading needed to be done, I would hide at this quiet Starbucks and order my two favorite items: a double iced tall non-fat latte (no sugar, no syrup- pure espresso) and a Black Bottom Cupcake. For every X amount of pages read, I could nibble on my little treat.

Then one day... they magically disappeared. Sadness fell upon the Kingdom. Hence, I took matters into my own hands and began a quest for a yummy copy cat recipe. I have looked at several sites and the core ingredients remained the same, but none really captured me. I tried one last year and it came out legit but unreliable. It tasted a lil diff every time I made it- and not in a good way. It simply didn't have that taste from my memory. Until I found this one from C&H Sugar.
Dry:
1 1/2 cups all purpose flour
1 cup granulated sugar
1/4 cup unsweetened cocoa
1 teaspoon baking soda
1/2 teaspoon of salt

Wet:
1 cup water
1/3 cup vegetable oil
1 tablespoon white vinegar

Yummy Center:
8 ounces cream cheese (room temperature)
1 egg
1/3 cup granulated sugar
1 cup semisweet chocolate chips (regular or miniature)

Heat oven to 350 and place cupcake liners in 18 tins.

Simple as can be- you don't even need to dirty your electric mixer. Mix the dry ingredients. In a separate bowl, mix the wet ingredients. Combine. Don't be fooled by light brown color- they darken up! Don't fret if there are a few lumps.

In a separate bowl, whip the cream cheese till smooth. I recommend a hand held electric mixer here to make things easier. Add in the sugar and egg. Beat till silky.

Optional: add the chips to the cream cheese mix OR sprinkle on top of the cupcake. Choice is yours.

Divide chocolate batter evenly amongst tins; then add a heaping table spoon of the cream cheese. Don't worry if it's not centered! No two will look alike. I made one with a little less chocolate batter into a monster cream cheese cupcake, moo ha ha.

Bake for 20-25 minutes and allow to cool for at least 10.

Also, these make great mini-cupcakes. I made 12 regular cupcakes and then a small tin of mini ones for the office for all the sensible New Years Resolution folks. These are cute cute cute! Cook for about 15 minutes- make sure you keep an eye on them. You can fix something undercooked, but never something overcooked.

Super moist. Rich. Sinful. Easy. Delicious. Make yourself some iced coffee and kick it with a good book! I recommend "World Without End" by Ken Follett. I read "Pillars of the Earth" last year (amazing, could not put it down) and this is the sequel. This is an author who knows how to end each chapter with the reader ready to throw the book out of anticipation and shock. Seriously, it's a struggle to put it down sometimes.

Friday, February 19, 2010

For the Cookie Lover in You

I hate baking cookies. Hate it.

They burn easily. They harden after 2 minutes. They're only good fresh out of the oven. They can be too thin and crunchy. Too buttery tasting. They're not reliable or consistent. You have to microwave them to be soft again. Uh, I don't have to microwave a cupcake to make it soft- it just stays that way. The hell is the deal Mr. Cookie!?


Hate is generally stemmed from ignorance. If you don't understand- learn. I found an interesting discussion on cookies from Joy the Baker. One of the key variables I learned about cookies is butter matters- creamed vs melted. Creamed creates thin and buttery while melted creates chewy and fluffy.

So last night, after extensive research, I decided to declare War on the Cookie and conquer my nemesis. Put on your war paint!!!!

The battle plan of choice is from Alton Brown.

2 sticks unsalted butter
2 1/4 cups bread flour
1 teaspoon kosher salt
1 teaspoon baking soda
1/4 cup sugar
1 1/4 cups brown sugar
1 egg
1 egg yolk
2 tablespoons milk
1 1/2 teaspoons vanilla extract
2 cups semisweet chocolate chips

Heat oven to 375 degrees.

Melt the butter in a saucepan over low heat. In a bowl, sift together the flour, salt, and baking soda and set aside. I learned that if you don't have kosher salt on hand, table salt is sufficient- just use half the amount.

Pour the melted butter in the mixing bowl. Add the sugar and brown sugar. Cream the butter and sugars on medium speed. Add the egg, yolk, 2 tablespoons milk and vanilla extract and mix until well combined. Slowly incorporate the flour mixture until thoroughly combined. Stir in the chocolate chips- I used Ghiradelli with 1 cup semi sweet and one cup 60% dark cocoa, I love dark chocolate!

Chill the dough- this allows the ingredients to have a chance to absorb each other. 4 hours is recommended but not mandatory. I only did about an hour. Scoop onto parchment-lined baking sheets, about 6 cookies per sheet.

Bake for 13 minutes or until lite golden brown. On the second batch, use a shorter cooking time because the pan is already hot. Cool completely and store in an airtight container- it will make a big difference.

I have to say it... these cookies came out delicious. And the best part- they stayed moist! They're on the thicker, soft, chewy side. I'm starting to see some possibilities in the land of cookies.

Food News: Nooks and Crannies

There are certain nom noms you just can't get anywhere else.

Maybe it's your grand mama's biscuits
Your pop's secret bbq sauce
The family lumpia
or the neighbor's amazing sangria

That's one of the beautiful things about food- you can pass it down generation to generation as part of your heritage and culture. You always know who made what at gatherings. Oh geez- it's burned- that means one of the cousins made it!- or - Wow, that melted in my mouth, must have been my brother in law.

I want to create a recipe that is coveted in such a way. How does one stumble across a unique classic? The dynamics of a tradition.

It's also a sad thing when people let these small family traits go because they simply do not want to to learn (same goes with language). So if your folks can cook something bangin, linger around the kitchen and take notes!

This just popped to mind while I was driving into work this morning listening to the radio. Apparently, there are only 7 people in the world who know how Thomas English Muffins work. I did not realize it was such a secret! Makes you wonder. Is it how the bake it? The type of flour?

How does one make a classic?

Thursday, February 18, 2010

The Lazy Man's Fried Rice

It's just one of those days and you don't wanna think when you cook- you want food. Here's the Lazy Man's version of fried rice.

1.5 cups of white rice (rice cooker)
Oil (canola, veggie, or peanut)
2 eggs
1/3 cup of frozen mixed veggies (peas, corn, etc.)
Soy Sauce
3 Chinese Sausages
Black Pepper

Heat oven to 450. Place sausage on aluminum foil or oven-safe surface to cook for about 10 minutes. I prefer baking the sausage because it loses some of the oil. You can also heat it over a skillet. You can find Chinese sausage at most global stores- it's usually by the hot dogs and is long/thin. Brand of preference:

While the sausage is warming....

In a cup, beat together two eggs. Add to small skillet and scramble. Set to the side.

Coat evenly another skillet/wok with a little oil. Cook the frozen veggies till slightly soft. Scoop in rice and add 2 tablespoons of soy sauce. Add some black pepper. Make sure you mix well. The amount of soy sauce and pepper is up to you! Don't over-do it though.

Remove the sausage from the oven and cut into small pieces. Add to the mix.

Voila! Lazy man's fried rice. I like this recipe because 1) it's super easy, 2) it's pretty basic stuff, and 3) there's no butter like how some of my other friends make it. Hope this proves handy on a lazy night after work!

Tuesday, February 16, 2010

Brownie Bottom Icecream Cuppys

Happy Valentines Day! I generally could care less for the day but hey- I like seeing hearts and tales of happiness. Romance in general is a Lost Art. There's something about seeing couples in love that brings joy and hope to the soul.

Upon request, I attempted to create Icecream Cupcakes. I was hesitant because it sounded out of my resources reach. Then I found a recipe Joy the Baker (hella cute blog) that was simple, easy, and delicious! These came out bangin and I customized them for the holiday. It's like eating a hot fudge sundae, minus the hot part.
The Break Down:


1) Make the brownie batter. Line two cupcake pans with the cupcake liners. Into each cupcake liner, scoop 1 Tablespoon of brownie batter. Foil liners are recommended but I used paper, the grocery store was out of foil and they turned out just fine.


2) The brownies will rise but cool so they're slopped in, perfect for holding icecream. Once cool, place in the freezer (still in the cupcake pans) for 30 minutes. When you place the cupcake pans in the freezer, remove the ice cream you’re using and place in the refrigerator to soften. I used strawberry and vanilla icecream. Every cupcake can be a different flavor- have fun with it!


3) When ready to assemble the cupcakes, remove the cupcake pans from the freezer. Run the ice cream scooper under hot water and portion a small scoop of ice cream into each cup while still in the cupcake pan. The cupcake pan will help the ice cream hold its shape. Quickly smooth the scoops of ice cream with the back of a small spoon and return the ice cream cupcakes quickly to the freezer. Let the newly formed cupcakes refreeze for 45 minutes to an hour.

4) In this time you can make the chocolate ganache and whipped cream. Let the ganache come to just around room temperature, and let the whip cream rest in the fridge until serving time.


5) Once the cupcakes are refrozen and nice and firm, remove from the freezer and top with a teaspoon of chocolate ganache. Smooth over the cupcake. Return once again to the freezer.

To serve, remove the cupcakes from the freezer about 5 minutes before you’d life to serve them. Finish with a dollop of whipped cream and serve!


For the brownies, a recipe from Bon Appetit.


3/4 cups all purpose flour
1 teaspoons baking powder
1/2 teaspoon salt
1/2 cup (1 stick) unsalted butter
3 ounces unsweetened chocolate, chopped
2 large eggs plus one egg yolk
1 1/8 cups sugar
1 teaspoons vanilla
Preheat oven to 350°F. Line two cupcake pans with foil cupcake liners.
Combine flour, baking powder, and salt in small bowl. Stir butter and chocolate in a bowl set over simmering water, creating a double boiler. Heat until melted and smooth.
Beat eggs, sugar and vanilla in large bowl to blend. Stir in warm chocolate mixture, then dry ingredients. Scoop 1 Tablespoon of batter into each foil liner. Bake until toothpick inserted into center comes out with moist crumbs attached, about 6 to 8 minutes. Cool to room temperature, then place in the freezer for 30 minutes before scooping the ice cream on top.


Ganache:


3/4 cup mini semisweet chocolate chips and 1/4 cup heavy cream
Bring cream to a simmer in a small heavy saucepan. In a small bowl, pour cream evenly over chocolate. Let stand for one minute to soften, then stir until smooth. If frosting is too loose to spread, let it sit at room temperature for 10 to 30 minutes, stirring occasionally, frosting will continue to thicken as it stands. Scoop onto cupcakes. Spread and refreeze until ready to serve.
Feel free to make double this if you want a good coat of ganache!

Sweetened Whipped Cream:


3/4 cup heavy cream
2 Tablespoons powdered sugar
dash of vanilla extract

Whip heavy cream for 3 minutes. Add powdered sugar and vanilla extract and continue to whip until thick whipped cream forms. Dollop onto Ice Cream Cupcakes just before serving.

Wednesday, February 10, 2010

Snowed-In Cupcakes


Basically, I wanted an excuse to make cupcakes with Snowflakes on top. I made 12 vanilla (Obsessed with Baking) and 12 chocolate cupcakes (Yummy Mummy). For the frosting, I made a Vanilla Butter cream and split it in half. I added 1/4 unsweetened cocoa powder to one half to make it chocolatey. The other half, I added 2 drops of blue food coloring for fun.

Snowflakes:
1 bag white chocolate chips
1 cookie sheet
wax paper
Snowflake clip art tracing sheets or just wing it


Melt white chocolate in a double boiler or microwave. Let cool, but not harden. Pour into a a pastry/ziplock bag with a small (#4) tip. Place snowflake clip art under wax paper on a cookie sheet. Pipe white chocolate over each snowflake. Let harden in refrigerator.

Optional: dust with edible pearl dust (available at craft stores) or sprinkle with the regular decorating sparkles from the grocery store while wet. Photo taken from Yummy Mummy- I did not use stencils.


Vanilla Cupcakes6 tablespoons unsalted butter
3/4 cup sugar
1 large egg
1 teaspoon vanilla
1/4 teaspoon salt
1 1/4 teaspoons baking powder
1 1/4 cups all purpose flour
1/2 cup milk plus 2 tablespoons

Preheat over to 350 degrees and line 12 cupcake tins.

In a bowl, whisk flour, baking powder, and salt together.

In a separate bowl,cream butter and sugar until light and fluffy. Beat in eggs, one at a time making sure it's well incorporated. Beat in vanilla.

Add flour mixture in 3 batches, alternating with milk. Do not over beat.
Bake for 16 to 20 minutes.


Chocolate Cupcakes1 cup all-purpose flour
1/2 teaspoon baking soda
1/2 cup unsalted butter, softened
1/2 cup granulated sugar
1/2 cup firmly packed light brown sugar
2 large eggs, at room temperature
3 ounces unsweetened chocolate, melted
1/2 cup buttermilk
1/2 teaspoon vanilla extract

Preheat oven to 350 degrees. Line two 12-cup muffin tins with cupcake papers. Set aside.

In a small bowl, sift together the flour and baking soda.

In a large bowl, on the medium speed of an electric mixer, cream the butter until smooth. Add the sugars and beat until fluffy, about 3 minutes. Add the eggs, one at a time, beating well after each addition. Add the chocolate, mixing until well incorporated. Add the dry ingredients in three parts, alternating with the buttermilk and vanilla. Do not over beat. Fill liners about three-quarters full.

Bake for 20–25 minutes.

Frosting
1/2 cup unsalted butter, softened
2 cups confectioners’ sugar
1/4 cup milk
1 teaspoons vanilla extract
(+ 1/4 cup unsweetened cocoa powder)
(Blue food coloring)

Cream butter and sugar; blend in milk and vanilla. If you want straight buttercream- stop here. If you want to a chocolate twist, add 1/2 cup cocoa power. If you want blue frosting, add food coloring to the desired shade. If you want both (like I did), split the frosting in half. In one half, add the 1/4 cup cocoa powder. In the other, add the food coloring. Add to frosting bag and pipe on top! I used about a 1/2 inch cut in a ziplock bag.

Monday, February 8, 2010

Peanut Butter Cake

Happy Birthday Josinu! I love my brother, he's the bestest. He crushes peanut butter so I decided to make him a peanut butter cake for his birthday. I got this recipe from Paula Deen.

The reviews were half and half; people either loved or hated it. I am in the middle. It's not bad but it's not great. The peanut butter taste is definitely there! However, it was a little dry which is what a few people warned in the review even with the recommended modifications and slightly shortened cooking time. I want my cake super moist and fluffy damn it. Other than- it's dead on for putter butter. I made up the frosting because I did not want it to be overly sweet- it's a mild chocolate flavor.

Peanut Butter Cake

by Paula Deen

1 cup all-purpose flour
1 cup plus 2 tablespoons sugar
3 1/2 teaspoons baking powder
1 teaspoon salt
2 cups graham cracker crumbs
1 cup peanut butter
1 cup plus 2 tablespoons milk
1 teaspoon vanilla extract
3 eggs

Frosting:


2 sticks unsalted butter
5 ounces unsweetened chocolate
1/3 cup buttermilk
1/2 teaspoon vanilla
1 cup confectioners sugar (or till thickened)

Preheat oven to 375 degrees if baking with a metal dish; 325 degrees if using a glass dish.

Sift flour, sugar, baking powder, and salt together. Add graham cracker crumbs, peanut butter, shortening, milk, and vanilla. Beat mixture with electric mixer on low until moistened, and then beat on medium for 2 minutes. Add eggs and beat for 1 minute.


Bake in greased 9-inch by 13-inch pan for 20-25 minutes. Do not remove from pan to cool. I do not recommend baking this is 2 pans. The top layer cracked when I placed it on the second so I had to switch them. This was a result of the slight dry quality of the cake.

The goofy home made batman logo was my own addition. Please pay no mind to the ghettoness. If you're curious, I simply outlined the batman logo on some wax paper with blue frosting then filled it with melted chocolate. I dipped it in ice water to harden and then placed it in the freezer for about an hour. I should have cut off the top of the cake to flatten it so the logo could have laid flat. It's the thought that counts and a lesson learned.

Sunday, February 7, 2010

Frosty the Cupcake

In conjunction with the Cake Drops, you can make all sorts of creations. Instead of baking a full yellow cake, I decided to split the batter: one small cake to mix with the frosting and the rest for cupcakes. I frosted the cupcakes as usual but rolled the Cake Drops in various sizes.

Instead of dipping the Cake Drops in chocolate glaze, I wanted a more wintery look so rolled the balls in some confectioner's sugar. Use white chocolate if you want more smoothness.
The arms are simply toothpicks and the nose/buttons/scarf is decorating frosting.
Get creative and stay warm!


Saturday, February 6, 2010

Cake Drops

My friend's mom let me have a few of these while I was visiting overseas and was hooked. They're simple, can be made easily in mass quantity, versatile, and full of innovation. You can literally make any flavor combination you can think of. Get creative!


Cake Drops

Instant cake mix

1 16oz can of frosting (standard issue)
or Cream Cheese
Chocolate (white, dark, whatever!) to melt for coating or Chocolate Bark

You can even add liqueur flavors. Kahlua and Baileys go great. Just drizzle some on the cake once it's cooled and a little less frosting.

Bake the cake per instructions and let it cool completely. Once cooled, vigorously stir in the frosting till well blended. Place in the freezer for 3 hours or over night. Easy prep!

Remove from freezer. Use a melon baller or your own 2 hands and form balls. Whatever size you'd like and in variety. Your call. Place on wax paper and return to freezer for another hour.

When it's almost time to remove the balls, prep the chocolate. I grabbed a bunch of leftover holiday chocolate bars. Simply melt in the microwave (30 seconds and then check) and continuously stir.
Get your production line ready. Have the balls ready to go, the dipping chocolate right next to it, and a bowl of cold water with ice cubes. Using a spoon/toothpick, take balls and dip in chocolate till coated completely. Drop into the bowl of ice water. The chocolate will immediately harden to ensure a clean coat. Once they are done, return to the freezer for another hour just to stay on the safe side.

Decorate as you please! You can double layer lightly with white chocolate or drizzle on designs.

Amish Pumpkin Cinnamon Rolls

Hello Blizzard 2010! What a way to kick off the new year. I love snow days- you can bum around the house in sweats all day or run around like a lil kid. I did a bit of both. My back porch steps make an awesome sled slope by the way.

Round one experiment was cinnamon rolls with a kiss of pumpkin. My brother and I are fiends for a Cinnabun at the mall. I got this recipe from the blog RecipeGirl.

Note: If you're gonna make these, make sure you have the time. These are easy to make but a smidge time consuming because of the dough rising.
Dough:
1/3 cup milk or soymilk
2 Tbs butter
½ cup canned pumpkin or mashed cooked pumpkin
2 Tbs granulated sugar
½ tsp salt
1 large egg, beaten
1 package active dry yeast
1 cup unbleached all-purpose flour
1 cup bread flour

Filling:
1/3 cup brown sugar, packed
1 tsp ground cinnamon
2 Tbs melted butter

Icing:
¼ cup (4 Tbsp.) butter
½ cup brown sugar, packed
2 Tbs milk
¼ tsp vanilla extract
dash of salt
½ to ¾ cup sifted powdered sugar

In a small saucepan, heat milk and 2 Tbsp. butter until almost melted, stirring constantly.

In large mixer bowl, combine pumpkin, sugar and salt. Add milk mixture and beat with an electric mixer until well mixed. Beat in egg and yeast. In a separate mixing bowl, combine flours. Add half of flour mixture to pumpkin mixture. Beat mixture on low speed for 5 minutes, scraping sides of bowl frequently. Add remaining flour and mix thoroughly (dough will be very soft). Turn into lightly greased bowl (butter works just fine), then grease surface of dough lightly. Cover and let rise in warm place until doubled, about 1 hour. My girlfriend Jess told me the higher the location you let things rise- the better. Don't ask the physics- just words of wisdom passed down.

Do not panic if you do not have bread flour. I'm stuck at home in a blizzard- I have the bare essentials. You can substitute bread flour with all-purpose flour. However, it will not come out as firm. Bread flour is used in pizza dough and such so it's got that strong rise. There's nothing wrong with all-purpose flour as a sub- just know it's not gonna be the exact same results.

Punch dough down. Turn onto floured surface. Knead a few turns to form a smooth dough, sprinkling with enough additional flour to make dough easy to handle. On lightly floured surface, roll dough into 12×10-inch rectangle.
In a small bowl, combine brown sugar and cinnamon. Brush surface of dough with melted butter. Sprinkle with brown sugar mixture. Beginning with long side of dough, roll up jelly-roll style. Pinch seam to seal. With a sharp serrated knife, gently cut roll into twelve 1-inch slices. Place rolls cut-side-up in greased (be generous with that butter- spray stuff aint gonna cut it) 9-inch-square baking pan. Dust off some of the flour. Cover and let rise until nearly doubled, 30 to 45 minutes.

Preheat oven to 350°F. Bake rolls about 20 minutes, or until golden. Remove from pan to waxed paper-lined wire rack. Cool 10 to 15 minutes.
While rolls are cooling, prepare icing: In small saucepan, heat butter until melted. Stir in brown sugar and milk. Stir in brown sugar and milk. Cool over medium-low heat for 1 minute. Transfer to a small mixing bowl and cool mixture slightly. Stir in vanilla, salt and powdered sugar. Beat with an electric mixer until well blended. If necessary, add more powdered sugar for desired consistency.

Drizzle icing over warm rolls. Enjoy!

Friday, February 5, 2010

Old Fashioned Hot Cocoa

"Snowflakes spill from heaven's hand
Lovely and chaste like smooth white sand
A veil of wonder laced in light
Falling gently on a winters night.
Graceful beauty raining down
Giving magic to the lifeless ground
Each snowflake like a falling star
Smiling beauty that's spun afar.
Till earth is dressed in a robe of white
Unspoken poem the hush of night"


Mix the milk, sugar, water, cocoa, and salt in a sauce pan over a low-heat and bring to gentle boil. Add the vanilla extract and optional booze. Serve with marshmallows, cookies, candy, a warm blanket, and a good book.
1/2 cup granulated sugar
1/3 cup hot water
1/4 cup unsweetened cocoa powder4 cups milk
1/8 teaspoon salt
4 cups milk
3/4 teaspoon vanilla extract
Godiva, Kahlua, or Bailey's liqueur to taste (optional)

Wednesday, February 3, 2010

Pumpkin Biscotti

Tonight I wanted to make some Cocoa-Nana bread but that plan went out the window when I discovered my mom had consumed the 2nd banana. I have a ton of ideas- I made 2 lists at work, one for 2010 goals and one for baking ideas.

I decided to veer away from the land of cupcakes and take a stab at my partner in cafe: a biscotti. I love biscottis. It's fun to say, "biscotti hottie!" I was inspired by this awesome set I received for Christmas. My eyes lit up on the first bite of the Pumpkin Spice. I found this recipe from Rock Scissor Paper in Los Angelas, CA.

Biscotti:

1/2 cup plus 1 able spoon unsalted butter, room temp
2/3 cup packed brown sugar
1 egg
2 1/2 cup flour
1 teaspoon baking powder
1 teaspoon pumpkin pie spice
3/4 cup packed canned, pure pumpkin
1/4 cup chopped pistachios (optional)

Glaze:

1 cup white chocolate

Preheat oven to 350. Line a baking sheet with parchment paper. Yields about 16 biscottis.

With an electric mixer, cream together butter and sugar. Add the egg and mix until just combined. Add the flour, baking powder, pumpkin pie spice, pumpkin, and pistachios (I did not use the pistachios). Mix till well blended. I actually added a lil cinnamon to kick it up.

Turn dough onto well floured surface and form into 12-inch long log. Press down until about 1 1/2 inches thick. Transfer to the parchment paper.

Bake until golden brown (about 40 minutes) and cool completely. Using a serrated knife, cut the log into 1/2 inch slices. Lay the slices on the baking sheet and bake a second round of about 1 hour, turning the slices every 15 minutes. I did not bake it for the full extra hour because it was already a golden brown after an additional 15 minutes of baking time on each side. Transfer to wire rack and cool.

Melt the white chocolate in the microwave or double boiler until smooth. Drizzle the white chocolate over the biscottis in a back and forth motion. My white chocolate was being stubborn and would not melt. I put it in the microwave and ended up zapping the moisture out of it. Quick fix- add a little milk or condensed milk and stir! It will smooth back out- do not panic.

Much to my surprise... these came out pretty good! I wanted a stronger pumpkin flavor but you could tell it was pumpkin. I highly recommend.